Sunday, February 20, 2011

C'mon ring those bells!


On Saturday, I was lucky to get the opportunity to tour the bell tower and carillon at the University of Denver.

The tower was completed in 1999, is 215 feet tall, and are 95 steps leading to the top. 

The interior of the tower is gorgeous. There are murals on the walls depicting the evolution of communication from the spoken word to the digital age. My pictures don't do it justice, but the colors and textures are amazing.


See that little red spiral near the ceiling? Let's take a closer look. 

Yep. Those are some of the 95 stairs we had to climb to get to the top. Just kind of hanging out there up there. Not the easiest thing for someone who has a fear of heights to deal with. Going up wasn't too bad, but coming down was another story.

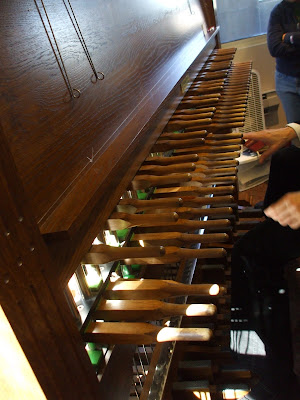
At the top of the stairs was a room housing the keyboard for the carillon. Each lever, or baton, is connected by a wire to the clapper of one of the bells. 

Here is another view of the keyboard. The bells can also be played with the pedals below. 

These are the two largest bells. It is hard to get a sense of how large they actually are, but the one on the top, which is the largest weighs close to 12,000 pounds. 

Here are some of the midsized bells.

And some more. All together there are 65 bells. The bells themselves are stationary and only the clappers move. 

At the bottom center of this picture is the smallest bell weighing only a couple of pounds. 

This is our lovely tour guide and the university's carillonneur, Carol Jickling Lens, playing a piece for us by Kabalevsky. It was really fun to watch her play. I didn't have much room on my camera, so this is only a snippet. After she played and gave us a basic overview of the instrument, we all took turns playing a little. It was slightly intimidating, but fun.

Carol plays the carillon each weekday when school is in session from 11:45 to 12:15. If you are in the area, be sure to listen for the bells.

This was a fantastic opportunity and an experience I will not soon forget. Many thanks to my Aunt Cathy for inviting me to come along on the tour.

Sunday, February 13, 2011

Think Pink!

When I was a kid, I had a book of Valentine's Day poems, and I've always remembered the start of one.

It's Valentines Day, so I'll create,
a special cake to celebrate
a cake that's good as cake can be
I'm using my own recipe.

I can't remember the rest, but I think the speaker puts all kinds of strange ingredients in the cake, like licorice and jelly beans and rice and I don't know what else, and of course the cake doesn't turn out all that great.

I like to bake for Valentine's Day, and while I didn't make a cake this year, I did give my pink food coloring quite a workout.

On Saturday, I baked some heart shaped sugar cookies and decorated them with royal icing using the flooding method. I had never used that technique before, and they are far from perfect, but I think they turned out kind of cute. Here are some of them.

I also made some oreo truffles, which I dipped in pink colored almond bark. I was kind of sloppy with my dipping, but they still taste good. If you've never made these before, they are super simple and really yummy.

Take a package of oreos and crush them. I put mine through the food processor. Then, mix the crumbs with a softened block of cream cheese. Shape the mixture into balls and chill it for about an hour. Then dip the balls into almond bark. If you are going to color almond bark, make sure to use a gel color. Liquid ones will make the almond bark do weird things.


Finally, today I made Cream Wafers. I usually make these around Valentine's Day, because that's what we did when I was a kid. They are a little time consuming, but worth it. The recipe is after the picture, and I believe it originally came from an old Betty Crocker cookbook.


Cream Wafers

Wafers:
2 cups flour
1 cup butter, softened
1/3 cup heavy whipping cream
granulated sugar

Filling:
3/4 cup powdered sugar
1/4 cup butter, softened
1 tsp vanilla
food color

Mix flour, butter and whipping cream. Cover and chill about 1 hour or until firm.
Roll 1/3 of the dough at a time 1/8" thick on a lightly floured surface. Cut into shapes with 1 1/2" cookie cutters. Sprinkle with granulated sugar. Prick each cutout with a fork.
Bake at 375 degrees for 7 to 9 minutes or until set but not brown. Cool completely.
Mix filling ingredients until smooth. Add a few drops of water if necessary. Spread about 1/2 teaspoon filling between pairs of cookies.
Makes about 5 dozen sandwich cookies.

Now, just so you know, I have no intention of eating all of this stuff. I plan on packaging it up and passing it out to the people I come into contact with tomorrow. Who knows, maybe it will be you!